Software for the HP 8903 Audio Analyzer
NEW 3/4/26 - Python app development
Philip van der Matten in the Netherlands, www.reeltoreel.nl, has taken on the task of writing Python code to run the 8903. This is a much better solution in the long term than using the old obsolete VEE programs.
You can see his work here: https://www.reeltoreel.nl/blog/?p=1227
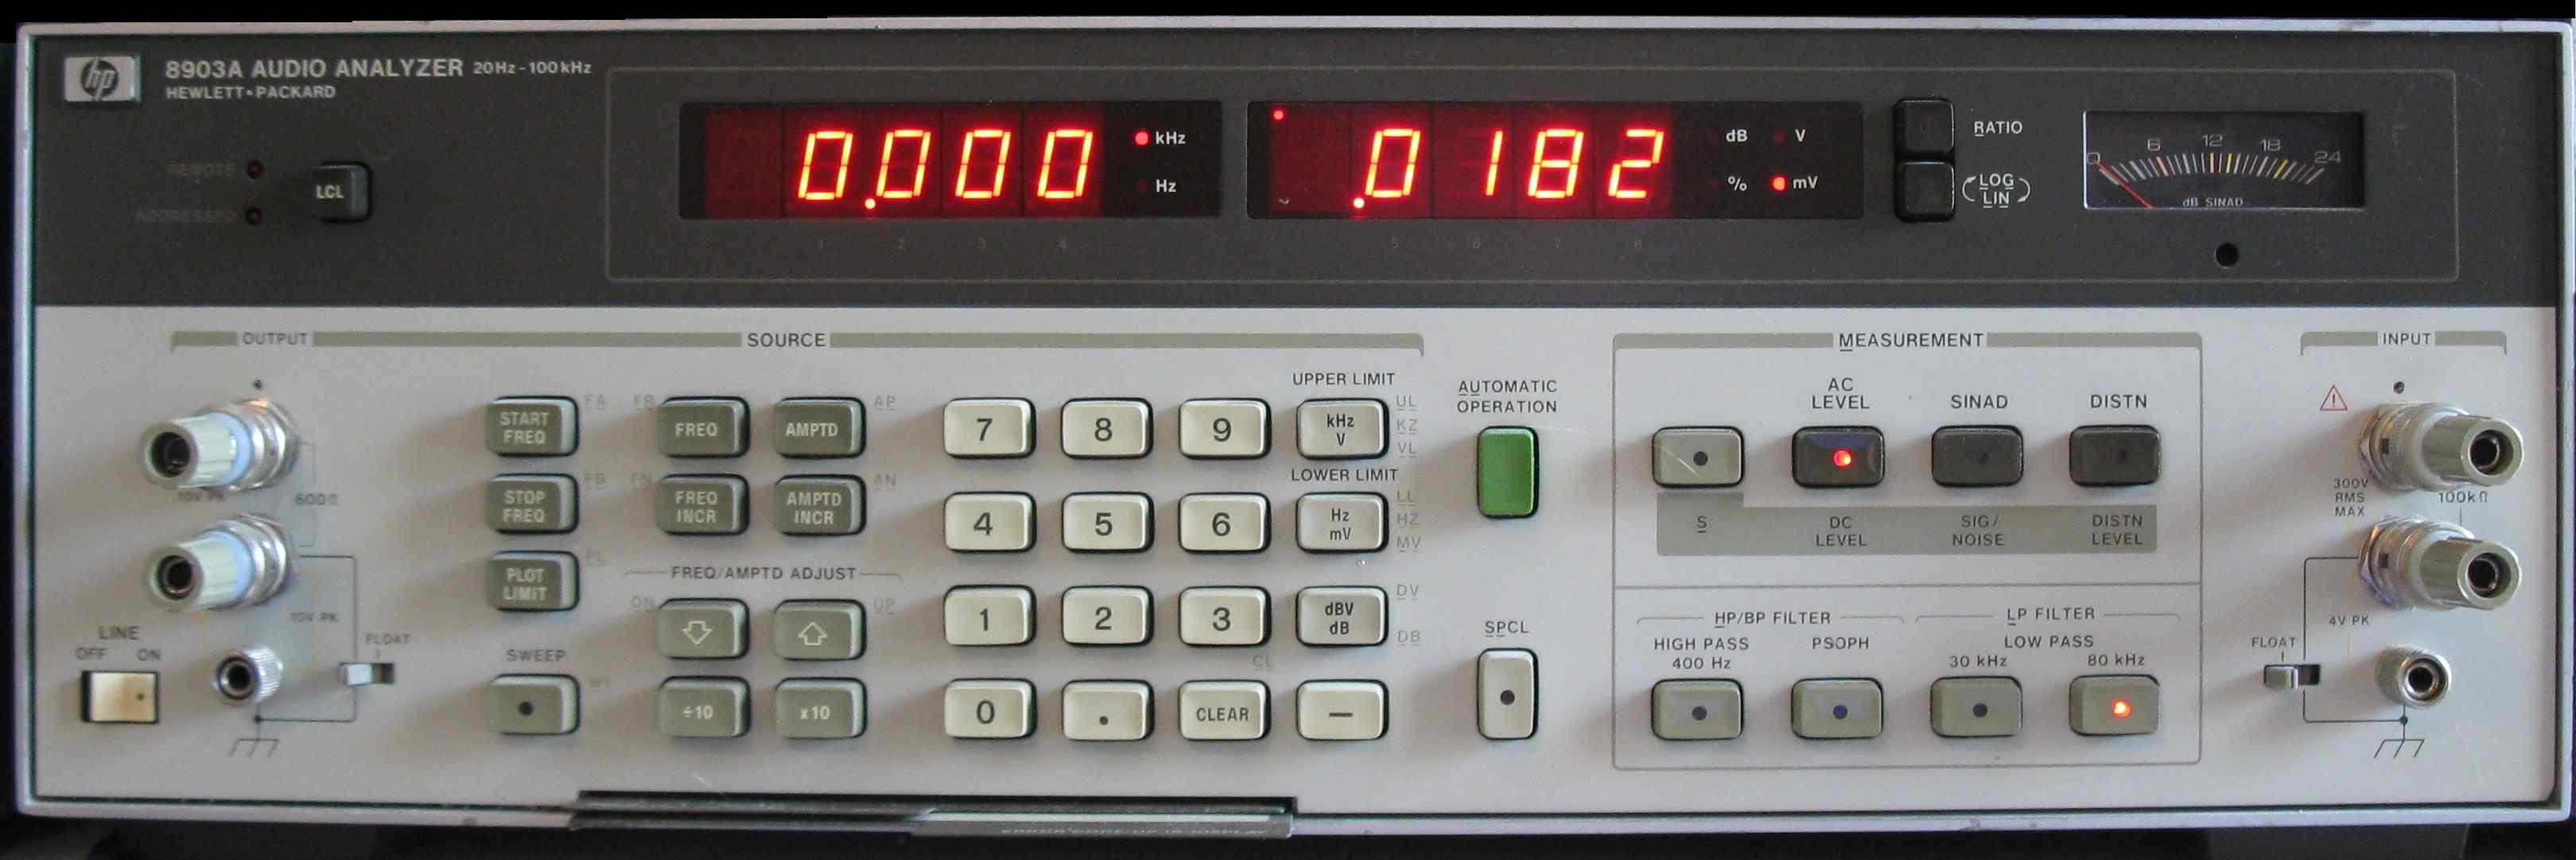
Before the Audio Precision box became the de facto standard for audio testing, there was the HP 8903...
The 8903 was available in three versions that I've seen: the 8903A, 8903B, and 8903E . The A and B versions include a low-distortion oscillator (source), whereas the E version does not. The A or B versions are certainly more useful for audio testing, and are required to run the software I've written. The B version included a few enhancements (like programmable generator source impedance), but for the most part the A and B can be considered equals.
HP 8903A and 8903B analyzers are plentiful and relatively inexpensive on the used market. I bought an 8903A freshly calibrated from a rental company for about $900. A recent look on eBay showed 13 of them, selling for buy-it-now prices of between $549 and $1699, depending on condition, calibration, guarantee, etc. Compare this to an Audio Precision boxes selling for $3000-$5000 in the used market, and the old HP 8903 is a bargain.
OK, the HP 8903 does not do everything that an AP box does. The most important thing it won't do for you, at least for me, is an FFT. But since an FFT is a relative measurement - no precise absolute voltage measurement is needed - a good sound card can perform at about the same level as an AP box. I use an M-audio Audiophile 192 card and Audiotester software to do FFTs, and the 8903 as the source. I get a noise floor of around -140dB. The AP boxes at work have about the same noise floor. And Audiotester is a lot easier to use than the brain-damaged application that runs the AP box. Sorry, Audio Precision...
But my biggest issue with the 8903 was that you cannot easily get plots - swept measurements - from it. To measure frequency response, I had to manually enter the frequency and write down the measurement (or enter it into a spreadsheet) to get a graph. That is painful.
However, the 8903 can be fully operated remotely through the GPIB port. For you youngsters, GPIB (also called HPIB) is a 8-bit parallel bus interface designed back in the 1970's to connect computers together with test equipment. It's a primitive interface by today's standards, but it still works. It's all a simple matter of software.
I really do not like writing software.
Luckily there are shortcuts for the "C++ challenged" like me. I bough a back-rev but brand new copy of a software program called VEE from Agilent (actually Hewlett-Packard - it was really back-rev). VEE is a sort of visual programming language that lets you design test programs without really writing any code. It's still a pain and I curse at the computer every time I use it, but at least it enabled me to make some programs that are useful to generate plots from the 8903.
VEE programs can be compiled into an executable form that, when coupled with a run-time package that is freely re-distributable (and also downloadable form the Agilent web site). So, I can distribute my programs, and you can run them for free!
Here are the four programs I have completed:
Frequency Response: FR_v2.vxe
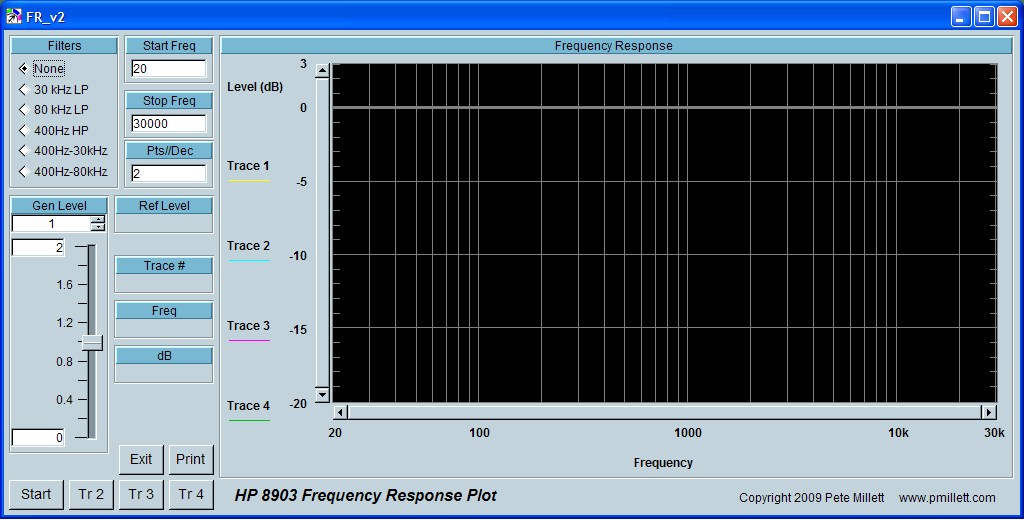
As you might guess this plots frequency response.
The "Filters" radio buttons lets you select any of the 8903's built-in measurements filters. Usually you don't want to use these if you're measuring frequency response.
"Gen Level" sets the output voltage of the generator for the test.
"Start Freq" and "Stop Freq" set the beginning and ending frequencies of the sweep.
"Pts/Dec" is the number of points you want to measure per decade. Many points makes a more accurate graph but takes more time.
To begin the measurement, hit the "Start" button. If you've enter illegal inputs for any of these you get a dialog box that pops up and tells you - hit OK and go back and fix them, then hit "Start" again. If you have filters enabled, you'll get a popup that warns you that the filters will affect the frequency response (duh!), and you may continue, or cancel and change the filter setting.
After hitting "Start", a dialog pops open and asks "Ref level OK?" Note the "Ref Level" box - this is the amplitude being measured at the reference frequency of 1kHz. This is used to make sure you have the "Gen Level" set correctly. For example, if you're testing a power amp and you want to run the FR test at 1 watt output, you set the "Gen Level" so you get and output of 1 watt, or 2.82V into 8 ohms. So "Ref Level" wants to be about 2.82V. Click "OK" and the test proceeds - "Cancel" if you want to go back and change the "Gen Level".
As the sweep progresses, you will see the numbers in the "Freq" and "dB" boxes change. These are the individual measurement points that are getting plotted.
After the first sweep is complete, you can perform one, two, or three more sweeps with the same conditions. This is useful, for example, to put left and right channels on the same plot, or if you're tweaking something and want to see how things are changing. The first sweep, after hitting "Start", will be in yellow. If you want a second sweep, hit "TR 2" (trace 2), and that data will be in cyan. Same for "TR 3" (magenta) and "TR 4" (green). The "Trace" box shows which trace is currently running (1-4).
You can change the scales on the graphs by hitting the axis titles ("Level (dB)" or "Frequency", in this case). You can also click the sliders or arrows on the plots to move.
If you want to send the plot to the printer hit the "print" button. This will print on the default system printer. Sorry, no easy way for the programmatically challenged like me to bring up a print dialog box.
When you're done, hit "Exit" to end the program.
THD+N vs. Frequency: THD_v2.vxe

The program plots the THD+N at a fixed level vs. frequency. This is useful for looking at amplifiers and especially transformers. High THD at high frequency is a result of slew rate limiting, among other things.
All of the instructions for the FR plot apply here as well.
The outputs are the same except instead of level ("dB") being measured we have "THD+N".
THD+N vs. Output Power: power_v2.vxe

This program plots THD+N at increasing power levels. This is useful to measure a power amplifier, to see how it's distortion rises with increasing power.
Instead of start and end frequency as above, here we have "Start Level" and "End Level" inputs. The "Start Level" is the minimum generator output - where the plot starts. If you set it very low, there may not be enough output from the amp to get a distortion reading. For normal power amps try somewhere between 10mV and 100mV. The "End Level" is the maximum generator output, where the sweep will end. Usually you want to set this above where you think your amplifier will clip.
Again we have "Point/Dec", which sets how many individual measurements are made.
In addition there is another parameter. "Max THD". A sweep will terminate if the THD measurement exceeds this number. Normally I set it at between 3 and 10 percent. This keeps you from driving your amplifier well past the clipping point.
Since the measurement is in watts, and you are really reading voltage, the analyzer needs to know into what load impedance you are running to correctly calculate power. The "Z load" pulldown box lets you choose 1, 2, 4, 8, 16, 32, 150, or 600 ohms. That pretty much covers power amps, headphone amps, and even line level outputs.
THD+N vs. Output Voltage: voltage_v2.vxe
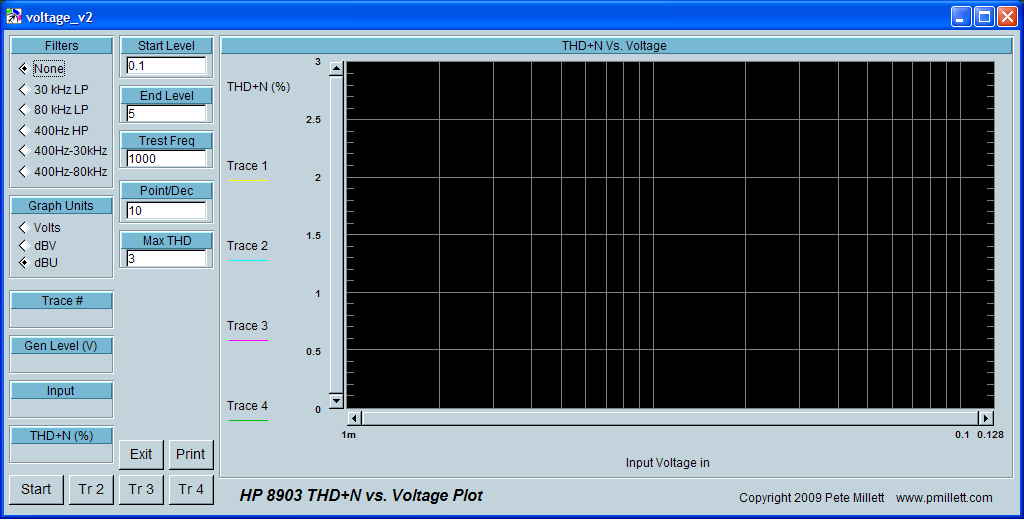
Very similar to the program above, the THD+N vs. Voltage plot measures the output voltage of a device instead of power. This is useful for headphone amps and line amps, where you may be more interested in voltage.
Since we are measuring voltage, there is no "Z load" pulldown. Instead there is a "Graph Units" selection of Volts, dBV, or dBU. dBV is dB relative to 1V, and dBU is relative to 0.7746V (the voltage that is 1mW into 600 ohms). Note that this selection only applies to the graph and the "Input" box - everything else stays in volts. Sorry, too much work to make everything speak three different levels...
Other than that this program functions similarly to the Power program above.
To run these programs, you need a system that meets the following requirements:
1. A PC running Win98 or later
2. A GPIB card. I know this works with National Instruments and HP/Agilent branded cards, both PCI and ISA. No guarantee on any others.
3. The driver for the GPIB card - supplied with the card, or can normally can be downloaded from NI or Agilent
4. HP VEE runtime package (free - see below)
5. My programs
Here's the easy part... a ZIP file with my four .vxe " VEE redistributable" program files, as well as the .VEE source files (if you want to modify things): ZIP archive
Here is an updated set of files contributed by user Matt: V3 Zip Archive
My programs should run under HP VEE 5.01 runtime or later. Download "HP VEE Pro 5.01 Runtime Bundle" from the Agilent web site here:
...or from my site (6MB self-extracting .EXE file) (I hope Agilent doesn't mind) - and install it.
My code looks for the 8903 at address 1428 - 14 is the address of the GPIB card (I'm using a National Instruments PCI-GPIB card) and 28 is the default GPIB address of the 8903.
One thing I'm not sure of is if any arbitrary installation of a GPIB card will come up at this address (14), or if you have to tweak something. Or maybe it doesn't matter.
When you install VEE runtime, you will get an application called "Instrument Manager" which allows you to configure the attached instruments. It looks like this:
.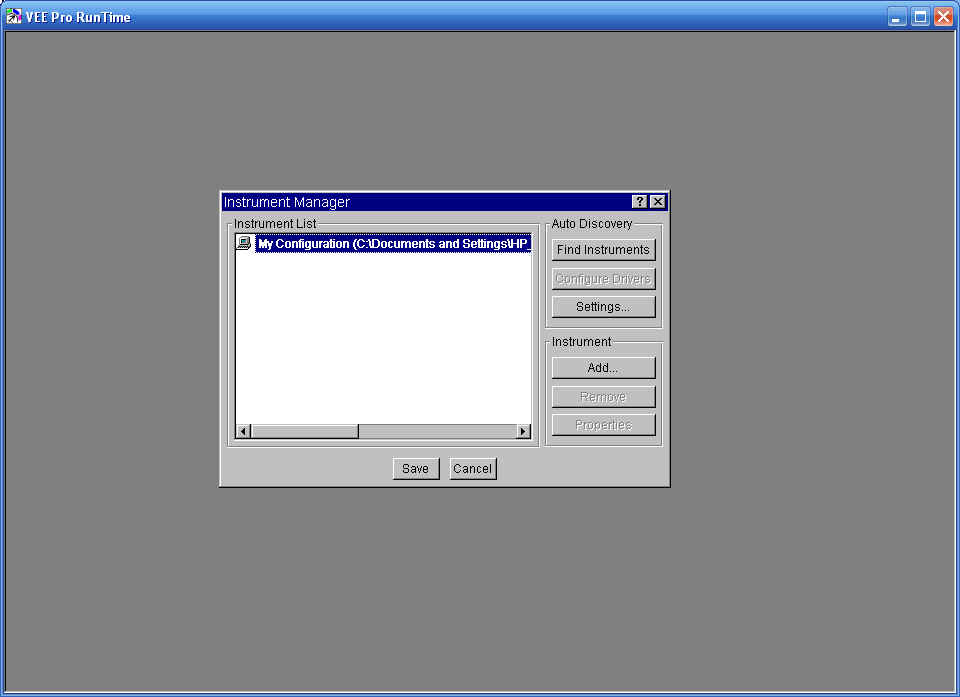
I think you can just hit "Find Instruments" and (assuming the GPIB card and driver are installed, and the 8903 is connected) the 8903 should show up. Again, one thing I'm unsure of is if the address of the GPIB card come out the same as in my system, or if it even matters. I vaguely remember having to change something to get things to play well together, but I don't remember if it was the GPIB card (or driver) or my sound card. I expect you also have to "save configuration".
After VEE runtime is installed you should be able to just double-click one of the .vxe files (FR, THD, Power, or Voltage) and it should run.
My chief beta tester Julian put together a note showing what he had to do to get all this running on his PC:
Hi
Pete,
Here is some text for you on what I did to get things up and running..
In general you need:
1. A windows PC
2. HP8903 (A or B)
3. HPIB or GPIB interface card & cable (for this purpose GPIB & HPIB are
interchangeable)
4. Drivers for the interface card
5. VEE runtime libraries
What I used:
The type of interface card you choose is critical. There are quite a lot of GPIB
interfaces out there that are hardware compatible with the GPIB/HPIB. But they
aren't necessarily compatible with the software - many come with their own
proprietary APIs/utilities. I cant give a full list of interfaces that are
compatible with the VEE and Pete's software... But I would go for a HP or NI
one. The card I went for was a NI TNT ISA (not the plug and play). These old ISA
cards are cheap now - I got a 'new old stock' one for about 10UKP. The only PC I
had with ISA slots is running WIN98SE. The NI drivers for this combination is
NI's V1.70. This is actually a whole suite of software with APIs and various
tools. NI do not have this version on the website – you have to mail them with
a product serial No for a download link. I am not sure why NI have chosen to so
this with this specific driver version – It's good of them to support such old
products at all though... After this the only other product needed was the VEE
5.01 runtime bundle from Agilent/HP, this is needed to run the .VXE files that
Pete has compiled. More recent versions may work, but I haven't tested
them.
So my system comprises:
1. WIN98 SE PC
2. HP8903B
3. NI ISA TNT GPIB interface
4. NI's V1.70
5. HP VEE 5.01 runtime bundle
To
set it up:
1. I installed the NI card. I used the default settings for the address,
IRQ, DMA etc. I then reserved these in the motherboard BIOS PnP set up (you may
or may not need to do this last step, depends on your PC...).
2.
Downloaded and installed the NI drivers, connected the HP8903B. My HP8903B came
with it's HPIB address set to 9. I left set to this. I then ran the auto detect
feature in the NI software to detect the interface and the HP8903. There is also
a utility to type in and send commands to the instrument, just to check
everything was working, I used this to send a few simple commands (see the pull
out sheet at the bottom of the HP8903 front panel for a command summary).
3.
I then installed the VEE 5.01 runtime bundle. This also has an auto detect
feature in it's I/O configuration setup to recognize available interfaces and
instruments. I ran this and left all settings at the default, other than the
instruments name, which I set to 'Audio Analyzer' for convenience.
At one point I didn't have this I/O configuration set up right, when I tried to
run the .VXEs that Pete sent me it gave a rather misleading 'File Format Not
Valid' error message.
That's
it! the .VXEs should be associated with the correct VEE application, so you just
double click on them to run!
I
have to admit I am not 100% sure I needed the NI V1.70 software/drivers to run
VEE as I hadn't tried VEE without them installed. I wanted to leave them on as
they look quite useful...
cheers
Julian
NEW 7/3/2011 - Got some additional tips on making this run under Windows 7 from Dorin Bodea in Rpmania!:
So there it is. Please try it out and let me know how it goes. I'm sure there are oddities and bugs in there - no guarantee I'll have the time to fix them as I've already sunk a lot of time into this, but I would like to know about it.